Artificial Grass Base Layer: How to Build It Right
Learn how to build an artificial grass base layer: excavation depth, aggregate choice, compaction, grading and drainage checks for a lasting lawn.

You've got a yard that looks fine from the patio, maybe a little patchy, maybe muddy where the dog runs. You price turf, pick a color you like, and assume the crew will roll it out like carpet. Most of the work that decides whether that lawn stays flat and dry happens before anyone unrolls the turf. The artificial grass base layer is that work. It carries foot traffic, holds the seams in place, and gives rainwater somewhere to go. Skip steps there and you'll see ripples, low spots, and puddles within the first season, no matter how good the turf product is.
Base Layer Depth and Materials at a Glance
Start with aggregate, not price. You want angular crushed rock or crushed granite with some fines, a dense graded mix that locks together when you moisten and roll it. Don't use rounded pea gravel or clean single-size stone. It won't compact tightly and it'll shift under your feet. Decomposed granite works for pet areas and firm finishes, but only if it compacts to the same target as crushed stone.
| Application | Aggregate and depth | Compaction or drainage target | Base cost per sq ft |
|---|---|---|---|
| Residential front or back yard | Crushed rock, 2-4 in | More than 95% Standard Proctor | $0.30-$0.50 base and install |
| Typical base with fabric | Crushed stone, 2-3 in sub-base | More than 95% Standard Proctor | $0.60-$1.75, typical $1.18 |
| Pet run with digging | Crushed stone or granite, 2-3 in | Drainage path to site outlets | $0.60-$1.75 with fabric |
| Putting green | Crushed stone base with built-in drainage | Planarity within 1/4 in | $0.60-$1.75 with fabric |
The 2025 artificial-grass cost guide from US Turf states that residential base layers typically use 2–4 inches of crushed rock, with base material and installation averaging $0.30–$0.50 per square foot. A separate specification in the 2025 artificial-grass cost guide from Mighty Grass gives a recommended sub-base thickness of 2–3 inches of crushed stone or granite. When fabric is included, the 2025 cost guide from Koira estimates crushed base and fabric at $0.60–$1.75 per square foot, with a typical cost of $1.18 per square foot.
How to Read the Rows
Pick the row that matches your use first, then check the compaction and drainage column before you compare prices. A front yard with light foot traffic can sit at the lower end of the depth range. A pet run that gets dug and scratched needs a firmer, deeper base held by a solid perimeter, plus a clear drainage path because you'll rinse it often.
Putting greens are the least forgiving. Artificial putting greens have built-in drainage that prevents water pooling, but the ball will still show every dip the base leaves behind. Your choice of artificial turf infill sits on top of this system, it doesn't fix a soft or uneven base underneath it.
The cheapest quote is rarely the cheapest base once drainage work and repairs are counted.
If a quote is far below the ranges above, ask what's missing. It's usually excavation depth, a lift of compaction, or an outlet for the water.
How to Excavate and Grade the Site
Say a yard looked level on install day, then sank in soft waves by fall. That usually means sod and loose topsoil stayed under the stone. Organic material breaks down, roots rot, and the surface follows it down. Excavation is how you stop that before it starts.
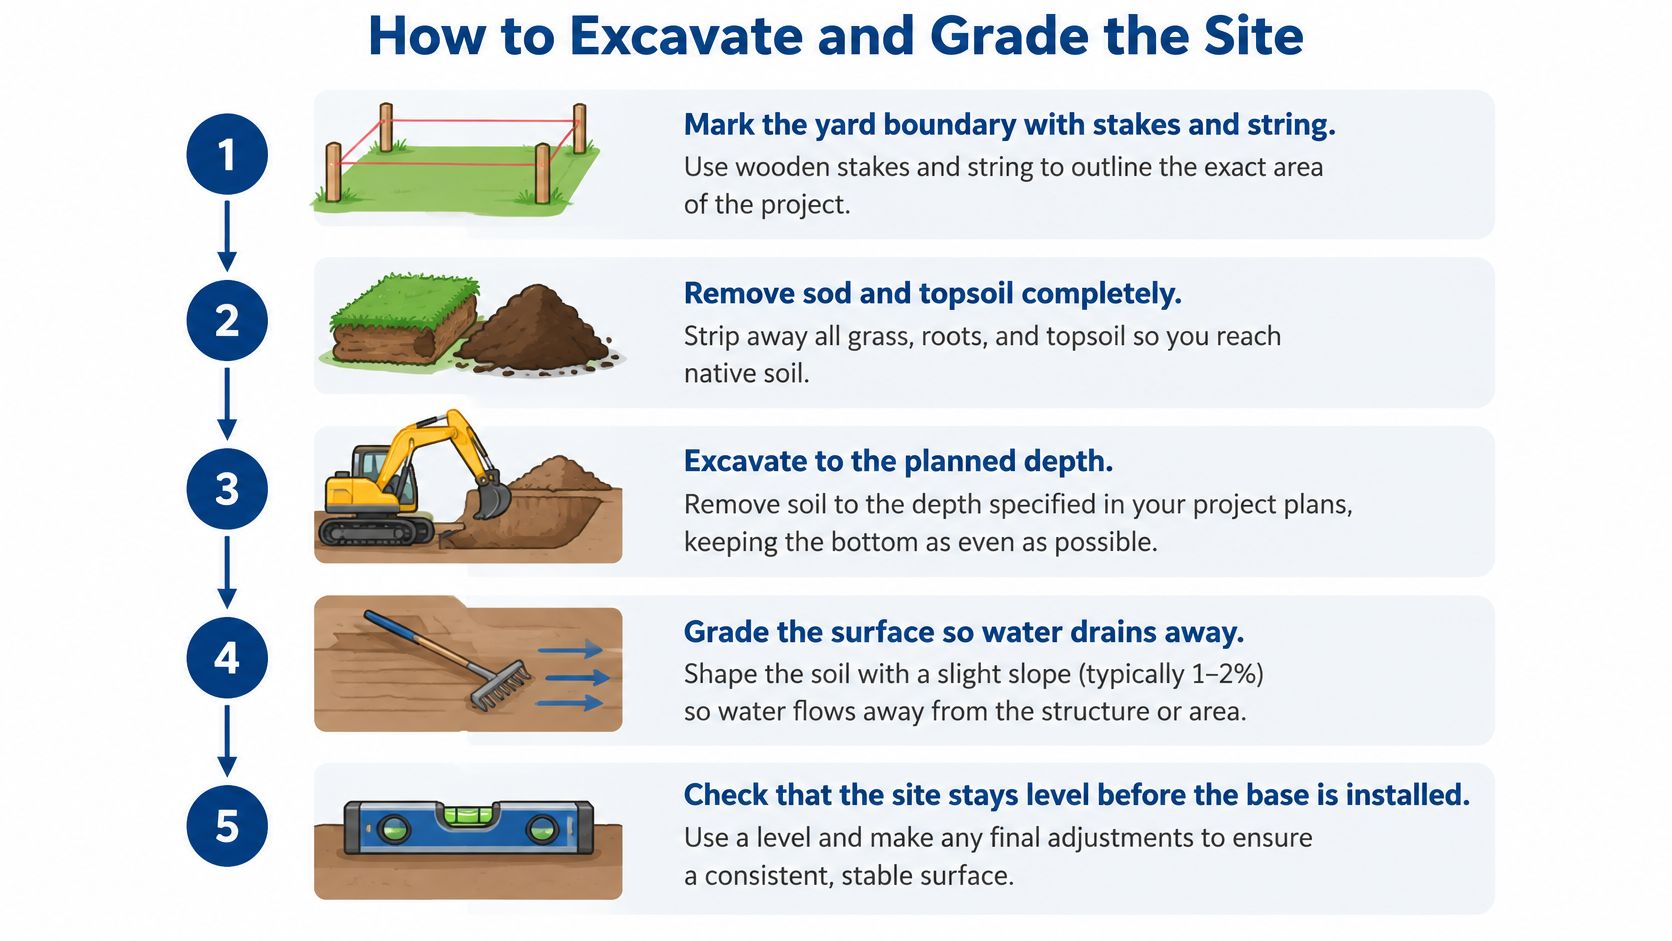
The sequence below walks through marking, stripping, and checking the subgrade before stone arrives.
The Six Steps
- Mark and call first: Stake the footprint, run string lines for the finished height, and call 811 before digging so utility lines get located. You don't want to find irrigation, electric, or a shallow gas line with a shovel.
- Strip to firm ground: Remove existing grass, roots, and topsoil, typically 4 to 6 inches deep, until you reach firm subgrade. A sod cutter speeds this up on larger yards. Haul the material out, don't bury it at the edge.
- Proof-roll the subgrade: Run a loaded vehicle or plate compactor over the exposed soil and watch for spots that pump, rut, or feel spongy. Dig out soft pockets, buried organic matter, and loose clay lenses, then backfill those holes with aggregate and compact them.
- Set the fall: Grade about a 1 to 2 percent fall away from the house, garage, or any structure. That's subtle to the eye, but it's enough to move surface water outward instead of toward a foundation.
- Install edge restraint: Set boards, bender board, pavers, or a concrete edge along the perimeter before stone goes in. Without restraint, compacted aggregate spreads at the edges and the turf perimeter drops.
- Check your levels: Pull a string line across the excavation in several directions and check with a level. Fix high and low spots now, while you're still working with soil, not after you've paid for stone.
The Step People Skip
Skipping the proof-roll is the common slip. The excavated surface can look uniform and still hide a soft trench line from an old utility run or a pocket of topsoil the bucket missed. That spot compresses later under foot traffic and telegraphs through the turf as a dip you can't brush out.
Cap or remove sprinkler heads during this stage too. A live irrigation line under a new base is a leak waiting to wash fines out of your aggregate. If you plan to keep irrigation for beds beside the turf, reroute it outside the footprint now.
Practical rule: If your boot heel twists easily into the exposed subgrade, that spot isn't ready for stone.
You're finished with excavation when the area is firm, uniformly shaped, sloped away from structures, and bordered on all sides. Nothing about it should look like a garden bed. It should look like a shallow, tidy tray ready to hold aggregate at a consistent depth. If rain hits before stone goes down, let saturated soil dry and recheck soft spots rather than trapping mud under the base.
How to Compact the Aggregate in Lifts
Compaction is measured, not guessed by how hard the surface feels under one boot. Guidance published through Michigan State University's Turfgrass Information Center states that the sub-base should be compacted to more than 95% of Standard Proctor density. The same guidance recommends planarity within plus or minus 1/4 inch across the finished plane, equivalent to a maximum total variation of 1/2 inch.
Watch how overlapping compactor passes lock each lift before the next one goes down.
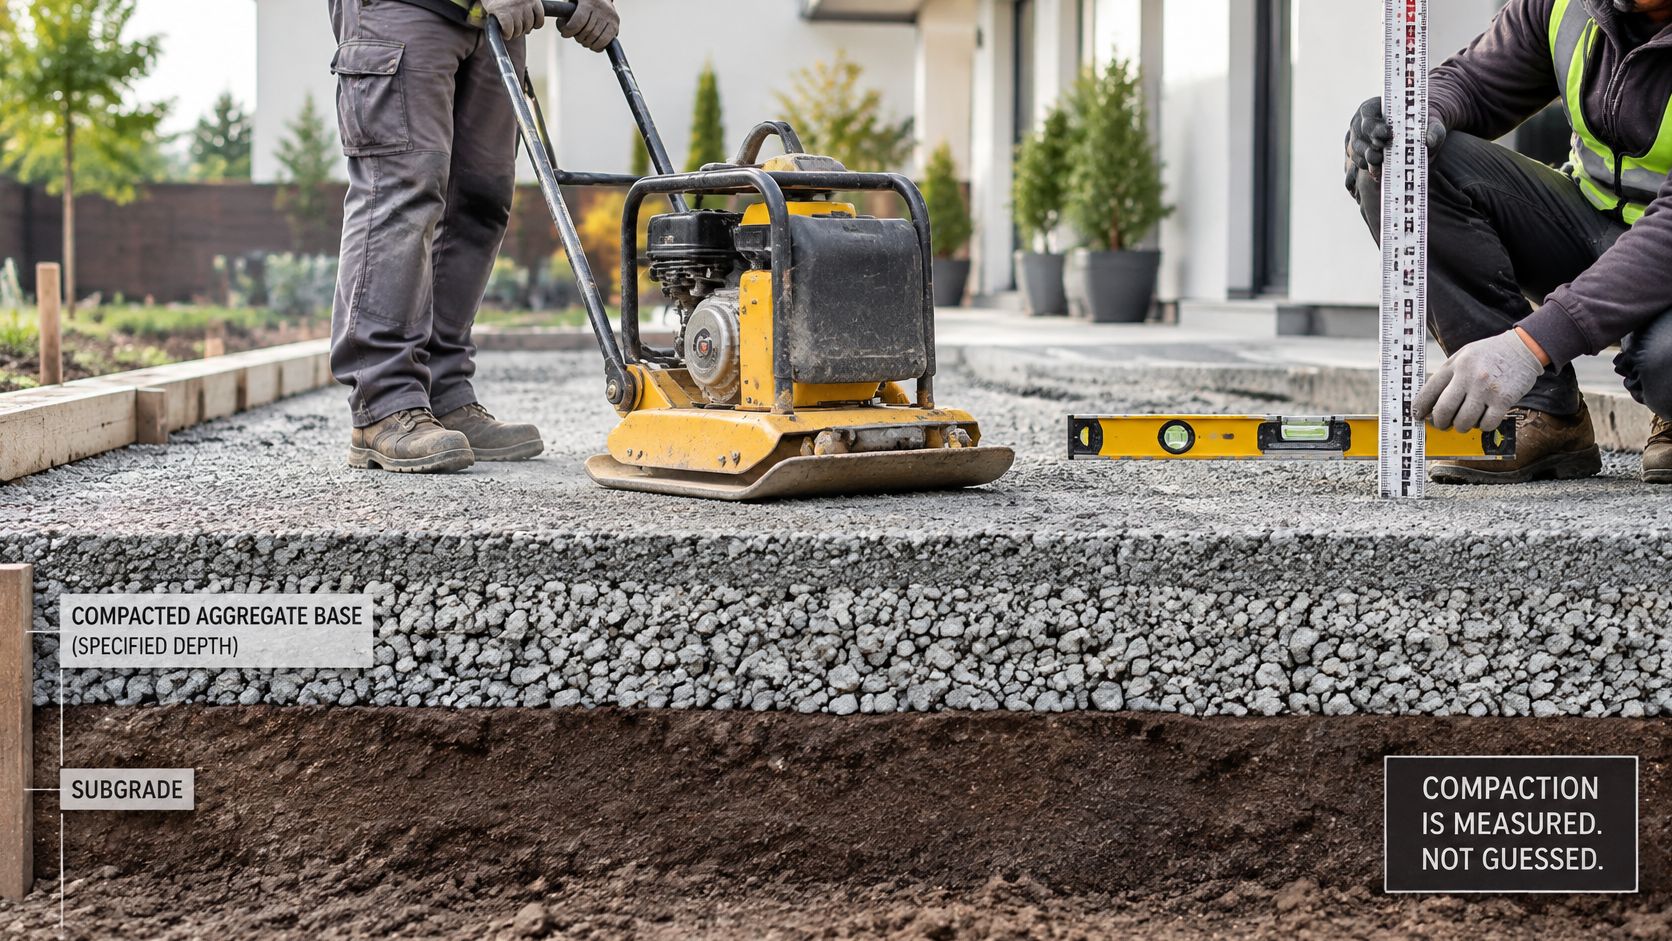
Those tolerances matter because depressions telegraph through turf, hold standing water, stress seams, and make the surface feel inconsistent underfoot. The base is a structural and hydraulic foundation, not just a leveling layer. Water passes through the turf, sits briefly in the stone, then moves toward site outlets. That only works if the stone is dense and graded, not loose.
Work in Thin Lifts
Spread aggregate about 2 inches at a time. Lightly moisten it so fines bind and particles seat against each other, damp rather than muddy. Run a plate compactor in overlapping passes, then cross the next pass at a right angle to the last so you don't leave uncompacted stripes.
Add a second or third lift the same way until you reach target depth. After each lift, drag a 4-foot straightedge across the surface with a level and fill low spots with small amounts of aggregate before compacting again. Don't try to fix a low area by dumping loose stone on top at the end.
A single thick lift is the shortcut that fails. The top crusts over and feels hard, while material underneath stays loose. Months of foot traffic finish the compaction for you, unevenly, and the turf settles into ripples and shallow basins. This is especially visible on a putting green installation, where a small dip changes how the ball rolls.
The video below shows plate compactor technique and the pass pattern in practice.
Use a simple field test as you go. If a footprint, wheelbarrow wheel, or the compactor itself leaves a clear mark, compaction isn't finished in that spot. Keep checking edges and corners by hand, since plate compactors often miss tight areas where turf seams and nails later need firm support.
Your goal is a smooth, firm, planar surface that lets turf lay flat without ripples. If you need to force turf down over humps or stretch it across hollows, stop and fix the base. Turf won't correct the shape beneath it.
How to Build Drainage Paths and Test Infiltration
Drainage is a measured system, not a hope that water finds its way out. The table below gives the elements and dimensions used in published synthetic turf construction guidance.
| Drain element | Typical size | Spacing or test | Key detail |
|---|---|---|---|
| Flat drain | 6-12 in wide, 1-2 in thick | 15-30 ft, diagonal or herringbone | Lays on the base surface under the turf |
| Perforated pipe | 4-10 in diameter | Runs to an outlet along the slope | Surround with clean stone and filter fabric |
| Open-graded edge aggregate | 6-9 in thick | Along the outside edge of the field | Carries water away from the base |
| Infiltration test | ASTM D3385 | One test per 10,000 sq ft of sub-base | Minimum 14 in per hour for the completed system |
The Sports Turf Managers Association best-management-practice guidance recommends an infiltration test and cites a minimum Synthetic Turf Council infiltration rate of 14 inches per hour for the completed system. That guidance identifies the stone base as critical to performance, drainage capacity, long-term surface stability, and planarity, with a typical system of native subgrade soil, base and finish stone, and drainage pipes.
How the Pieces Connect
Water moves through turf backing into the stone base first. From there it follows the designed slope sideways and down to a flat drain, perforated pipe, or open-graded edge. The pipe or edge aggregate then carries it to a daylight outlet, catch basin, or other site outlet away from structures.
Every element has to run downhill. A drain laid flat or, worse, running uphill will hold water in the base. An outlet buried behind a raised flowerbed edge or mulch dam does the same thing. Before turf covers anything, walk the full path with a level and confirm water has an exit you can point to.
Filter fabric around perforated pipe and clean stone keeps fines from clogging the pipe openings. Don't wrap the whole base in plastic or use an impermeable sheet where the design calls for infiltration. You'll trap water exactly where you wanted it to move.
Scale changes the hardware, not the principle. A small residential yard may need only a graded stone base draining to a perimeter outlet. A large or heavily used area, including many projects for artificial grass installation for dogs, benefits from pipe runs because rinse water is added on top of rainfall.
A drain without a clear, downhill outlet is just a buried place for water to sit.
After the first real rain, check the surface within a short time. Water should clear without standing pools at seams, edges, or low points. Persistent puddles tell you the slope, outlet, or infiltration path needs correction while the system is still new.
When a Standard Base Will Not Drain
Say an Indianapolis yard drains fast through its new turf, yet water still pools along the back fence after a storm. That doesn't mean the turf backing failed. It usually means the subgrade beneath the stone can't accept water as fast as the surface delivers it.
A flooded edge like this points to a drainage path problem below the turf, not a turf problem.
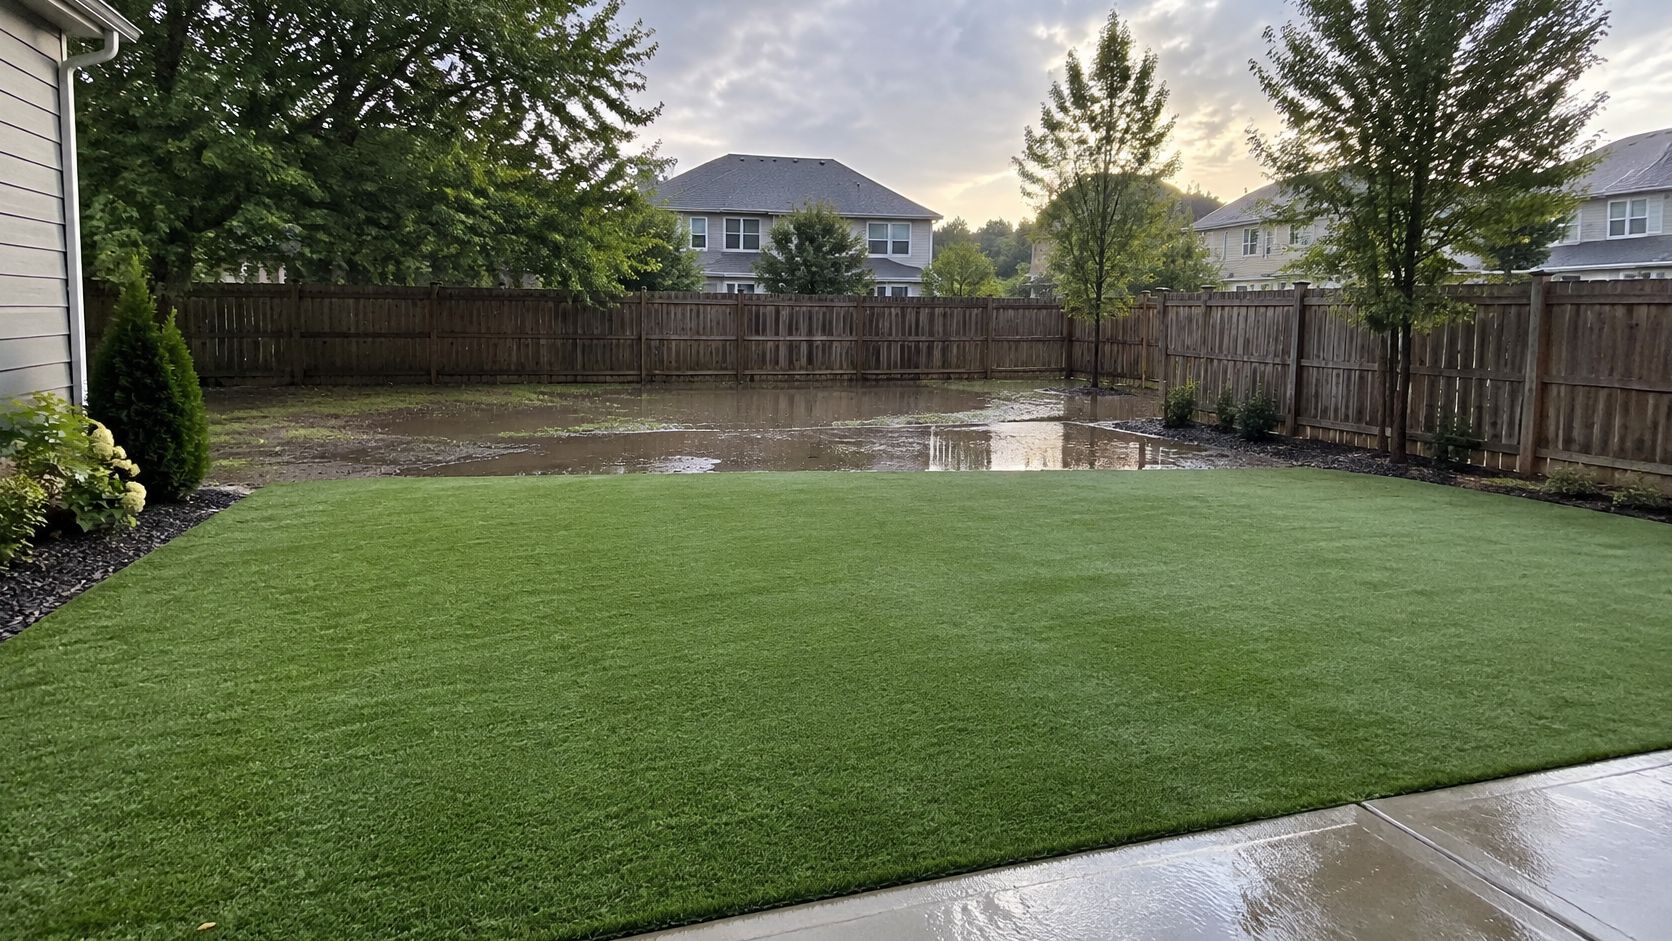
Independent guidance summarized in the State of New Jersey DEP synthetic turf report makes the point directly. A synthetic surface may drain rapidly while the subgrade beneath it remains slow, saturated, expansive, or compacted, so water moves laterally toward edges, collects at low points, or requires perforated pipes and perimeter outlets. A layer of crushed stone by itself isn't a drainage system.
Warning Signs in Your Yard
- Standing water for hours: Water stays on natural ground or pavement long after rain ends, in the same spots every time.
- Wet foundation edge: Soil stays damp against the house or garage, or mulch washes toward the structure.
- Cracking clay: Soil cracks when dry and turns slick and sticky when wet, a sign of expansive, slow-draining clay.
- Existing ponding: The yard already ponds before turf, especially with freeze-thaw movement or a high water table.
Heavy clay is common around Indianapolis, and it changes the design. Where soils allow infiltration, a permeable base works. Where they don't, I would specify an impermeable approach with collector pipes, gravel trenches, or underdrains tied to perimeter outlets, so water is carried away rather than asked to soak in. Geotextile or geogrid may also be needed to keep fine soil from migrating up into coarser stone and clogging it.
An engineered system can improve runoff management compared with unmanaged, waterlogged ground. A poorly designed one can make localized ponding worse by delivering water quickly to a low edge with no outlet. The difference is site investigation, infiltration testing, and outlet planning before stone is ordered.
Ask this before you sign anything. What happens to stormwater after it passes through the turf, and how will the installer verify that native soil, slope, outlets, and aggregate work together? If the answer is only that the stone drains well, get a site investigation or an engineer involved, especially where basement water is already a concern.
Mistakes That Ruin a Base and How to Fix Them
Start with what you see, then match it to the base cause underneath. Check water-related causes early, because a low, wet spot can also show up as a dip or ripple.
| Symptom | Likely base cause | Fix |
|---|---|---|
| Ripples or wrinkles within months | Thin or uneven compaction | Lift the turf, re-compact in lifts, relay |
| Standing water after rain | Low spot or missing outlet | Regrade toward an outlet or add a drain run |
| Dips and soft spots | Organic material or soft subgrade left in place | Excavate and replace with compacted aggregate |
| Seams lifting or edges creeping | No edge restraint or subgrade movement | Install edge boards and check the subgrade |
| Weeds through the turf | Weed barrier missing or torn | Cut out the section and reinstall the barrier |
Some fixes are one-day homeowner jobs. A torn weed barrier in a small section, one loose seam, or a short creeping edge can be handled with a utility knife, a stiff brush, and a few edge boards.
Ripples across a large area, deep soft spots, or standing water that needs a new drain run are different. Those mean lifting turf and rebuilding the artificial grass base layer in lifts, which is usually professional work. Don't relay turf over a wet low spot to hide it. You'll buy one quiet season and repeat the repair.
Decide Whether to Build the Base or Hire It Out
Match the task to the equipment and checks it needs, not to how simple it looks in a video.
| Task | Suits a homeowner? | Why |
|---|---|---|
| Excavation and grading | Yes, on a small and sound yard | Needs a string line and level check |
| Compaction to measured density | Only with a plate compactor and checks | Density has to be verified |
| Drainage testing | Usually professional | Infiltration test per sub-base area |
| Clay soil or high water table | Usually professional | Needs site investigation first |
A small, sound yard with good natural drainage is manageable with a rented sod cutter, plate compactor, and patience. Clay soil, a high water table, or water moving toward a foundation isn't the place to learn by trial and error. Compare quotes on what the base includes, since base figures alone don't cover excavation, drainage pipe, testing, or edge restraint. For context, artificial turf installed in Indianapolis, IN typically costs $8–$15 per square foot installed.
Our long-lasting installation scope includes excavation of existing grass and soil, installing and compacting a crushed stone or decomposed granite base, adding a weed barrier, laying turf with tight seams, securing edges, applying infill, and final power brushing. That sequence matters more than any single product choice.
This week, write down your soil type, your slope direction, and where water pools after rain. Then request a base plan that names the aggregate, depth, compaction method, and drainage outlet before any work begins.
If you're planning turf in Indianapolis and want the base designed for your soil, slope, and drainage outlet rather than guessed, Waterloo Turf Indianapolis can prepare a base plan covering excavation, compacted crushed stone or decomposed granite, weed barrier, seams, and edge securing. Visit Waterloo Turf Indianapolis to request an assessment and get the drainage path settled before turf is ordered.