Putting Green Installation: A Step-by-Step Backyard Guide
Learn how to plan, base, drain and seam a putting green installation, with layer specs, a step-by-step build order and fixes for common mistakes.

You've picked out a corner of the yard, pictured a few cups and started comparing turf samples. The tempting shortcut is to strip the lawn, smooth the dirt and roll out the green. But if that surface dips under your shoes or holds puddles after rain, a better turf product won't fix it.
A successful putting green installation starts below the turf. Spend your effort on the excavation, drainage and contours first. The finishing work matters, but it can only be as accurate as the surface supporting it.
What a Backyard Putting Green Needs Underneath
Laying turf over an old lawn leaves roots, organic material and uneven soil beneath a surface that needs precision. As that material breaks down or shifts, the green can develop depressions. You'll feel them underfoot before you understand why the same putt keeps taking a different line.
A synthetic green is a layered structure, not a carpet laid outdoors. The supporting materials must carry foot traffic, retain the intended contours and provide an escape route for water.
The USGA's putting-green construction guidance establishes drainage and accurately prepared supporting layers as foundational requirements, specifying at least 4 inches of washed gravel beneath approximately 12 inches of sand-based rootzone for its natural-grass construction profile. That isn't a backyard synthetic-green recipe. The transferable principle is to engineer the support and drainage before installing the playing surface.
Build a product-specific layer stack
Choose the turf system before finalizing excavation. Its backing, infill and supporting-material requirements affect the finished elevation.
Layer stack for a residential synthetic putting green
| Layer (top to bottom) | Typical depth | Material | Job |
|---|---|---|---|
| Synthetic putting turf | Pile height and installed thickness set by the product | Putting-green turf with compatible infill | Surface that carries the ball true |
| Leveling layer | Thin screed layer within the turf supplier's permitted thickness | Approved crushed stone dust or decomposed granite | Gives the turf a uniform, smooth bed |
| Compacted base | Compacted design depth specified for the soil and turf system | Approved crushed stone, compacted per lift | Supports traffic, holds contours and provides drainage routes |
| Subgrade | Excavate to finished elevation minus the complete installed layer stack | Suitable native soil, compacted and smoothed | Removes unsuitable material and supports the assembly |
| Edge restraint | Full perimeter, embedded or anchored to the edging system's specification | Landscape edging or buried anchor | Contains aggregate and secures the turf perimeter |
Don't treat stone dust and decomposed granite as interchangeable everywhere. Ask whether the proposed material compacts firmly while maintaining the drainage behavior the system needs. A thick layer of fines isn't a substitute for a properly designed base.
Establish the excavation depth before ordering
Set a permanent elevation reference outside the work area. From that reference, mark the finished turf height at patios, paths and other fixed edges, allowing for the complete installed assembly.
If removing the organic soil takes you below the planned subgrade, replace it with suitable compacted material rather than leaving loose fill underneath.
Practical rule: Know the bottom elevation and the finished elevation before buying aggregate. The space between them is your construction allowance, not a depth to guess with a shovel.
Shaping Contours That Roll True
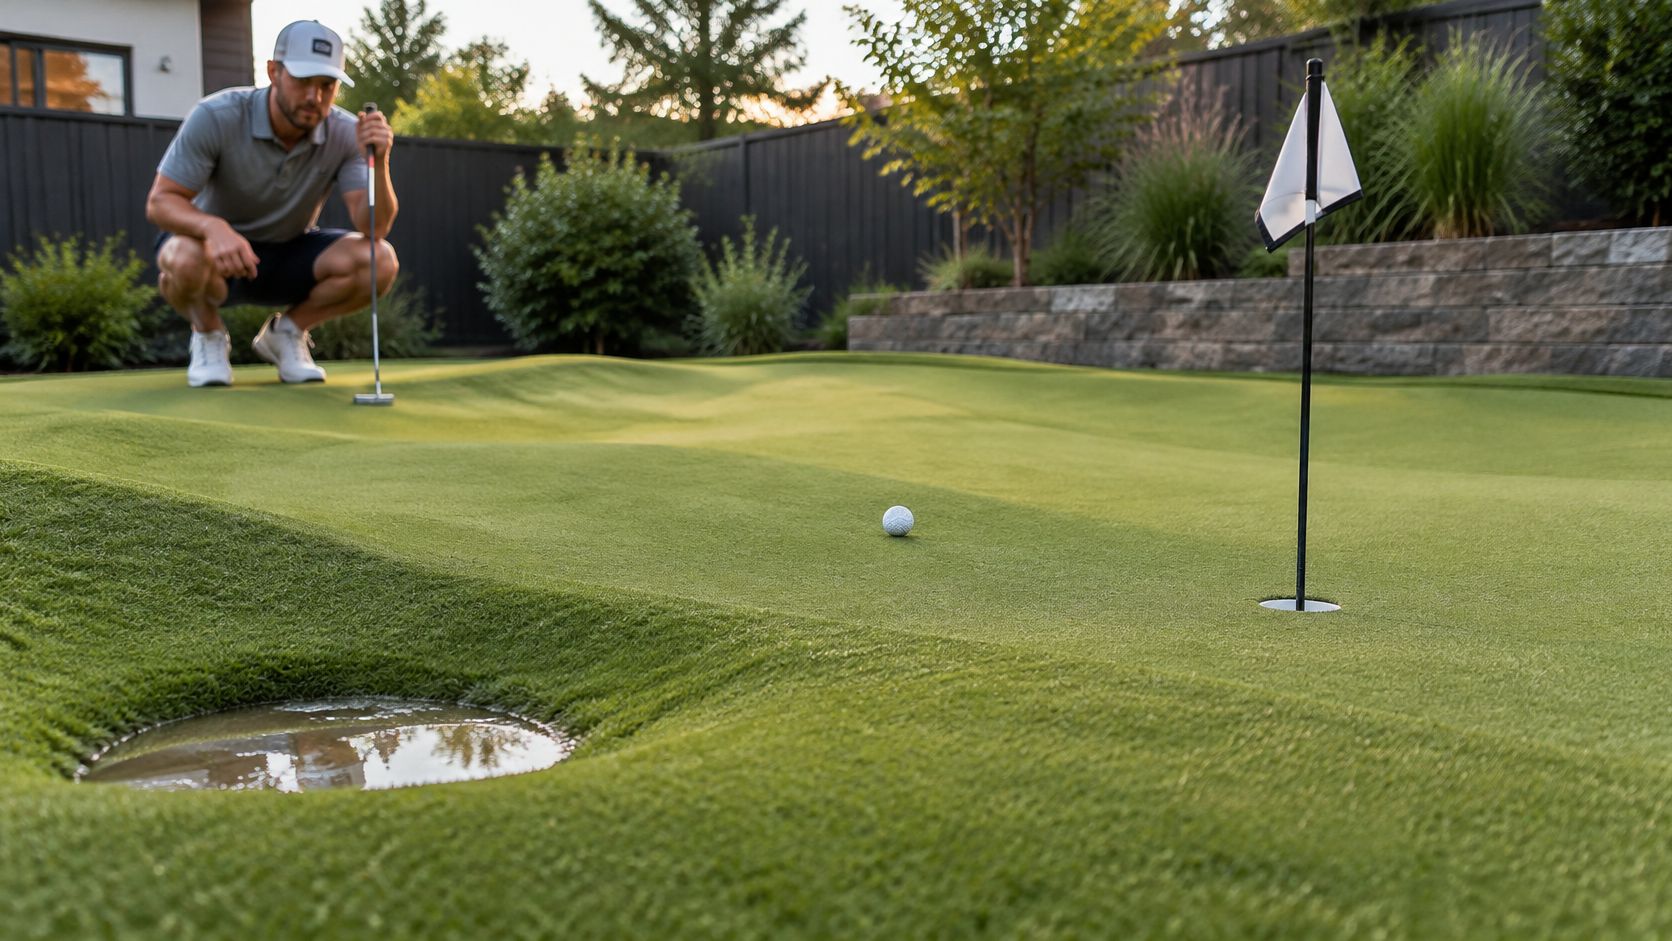
A playable slope guides the ball along a repeatable line. A depression catches both the ball and water. The difference isn't how dramatic the green looks, but whether every low area has a route to an outlet.
Use the putting position to judge contours, not just the view from the patio.
Work through a simple layout
For a hypothetical 15-by-20-foot green, place the high side along the back edge and direct the fall toward an approved front drainage outlet. Treat those dimensions as a layout example, not a recommended size.
Start with a broad, gentle plane. Add a long, low shoulder for breaking putts rather than a short mound that sends a ball sharply sideways. Keep cup locations away from abrupt transitions so you can practice controlled putts rather than trying to stop the ball.
Use a laser level to record elevations at the perimeter, intended cups and changes in contour. Lay a rigid straightedge across transitions, then rotate it across the same area. A gap underneath can reveal a hollow that's difficult to spot from standing height.
Check different things as construction progresses:
- At subgrade: Confirm the intended drainage direction and identify unsuitable pockets.
- During base construction: Check that compaction hasn't flattened a planned shoulder or created a depression.
- At final screeding: Look for smooth transitions without loose patches or sharp ridges.
Shape the support, not the finished carpet
Build the breaks into the compacted aggregate. Pulling installed turf over a mound or trying to stretch it into a hollow can leave wrinkles, uneven tension and an unreliable playing surface.
Don't confuse a drainpipe's required fall with the green's playing slope. Choose the surface contour around putt control, the available outlet and the selected turf's performance.
Use this installation video as a visual companion when considering the work sequence.
Before accepting the contour, test water movement and trial-fit the turf for ball testing. Roll a ball from each corner toward the center and cups. Watch where it repeatedly stops or accelerates, then investigate any result that doesn't match the planned break.
Choosing Turf Width and Planning Seams
Turf roll width and seam count by green width
The following is a hypothetical cutting plan using the stated roll widths. Confirm actual supplier availability, usable width and roll length before applying it to your yard.
| Green width | Roll width | Seams across the width | Planning note |
|---|---|---|---|
| Up to 12 feet | Assumed 12-foot roll | None | Single roll, cut to length with trimming allowance |
| More than 12 feet, up to 15 feet | Assumed 15-foot roll | None | Confirm usable width and available roll length |
| More than 15 feet, up to 30 feet | Assumed 15-foot rolls | One longitudinal join | Position the join away from sensitive cup approaches where possible |
| Over 30 feet | Assumed 15-foot rolls | Additional joins required | Draw each panel, match pile direction and check available lengths |
A nominal roll width doesn't automatically equal usable finished coverage. Edge trimming, irregular boundaries and the supplier's cutting requirements can change the layout.
A single panel avoids a join, but a larger unseamed piece can be awkward to carry and position. Multiple panels may simplify handling while increasing the finishing work. Choose the roll plan before fixing the green's outline, especially if you're deciding between a simple shape and decorative curves.
Select for putting, drainage and summer use
Ask for putting-green turf rather than general grass. Compare samples for pile consistency, density, backing construction, compatible infill and UV stabilization. Test a sample on a firm, smooth support, not over a soft lawn.
Look for a drainage backing that works with the proposed base. Perforations don't solve a blocked outlet or an impermeable layer underneath.
Where practical, align joins with uncomplicated contours and keep them away from critical cup approaches. Matching pile direction matters across every panel, even when rotating a piece would reduce waste. Order enough additional material to trim cleanly without pulling panels into position.
Heat belongs in this decision too. The New Jersey Department of Environmental Protection's 2025 review concluded that synthetic turf is generally hotter than natural turf during the day and noted higher heat-illness risk for active children on hot, sunny days, while stating that research hasn't conclusively shown synthetic turf itself causes more heat illness.
A green can roll consistently and still be uncomfortable to use in direct summer sun.
Plan shade where feasible, check surface conditions before children or pets enter, and shift practice to cooler periods when necessary. Don't buy a cooling claim without understanding the product's operating requirements.
How to Build the Base in Ten Steps
Before ordering stone, calculate the excavation and aggregate quantities using the actual shape and compacted design thickness. For rectangular areas, multiply length by width by depth in matching units, then use your supplier's volume conversion and compaction allowance. Curved areas need to be divided into measurable shapes.
The USGA construction sequence provides a useful drainage benchmark for natural-grass greens: minimum 4-inch drainage pipes, lateral spacing no greater than 15 feet, and continuous pipe slope of at least 0.5 percent. A residential synthetic system needs its own design, but the sequence remains useful: establish elevations, prepare support, provide drainage and verify the layers.
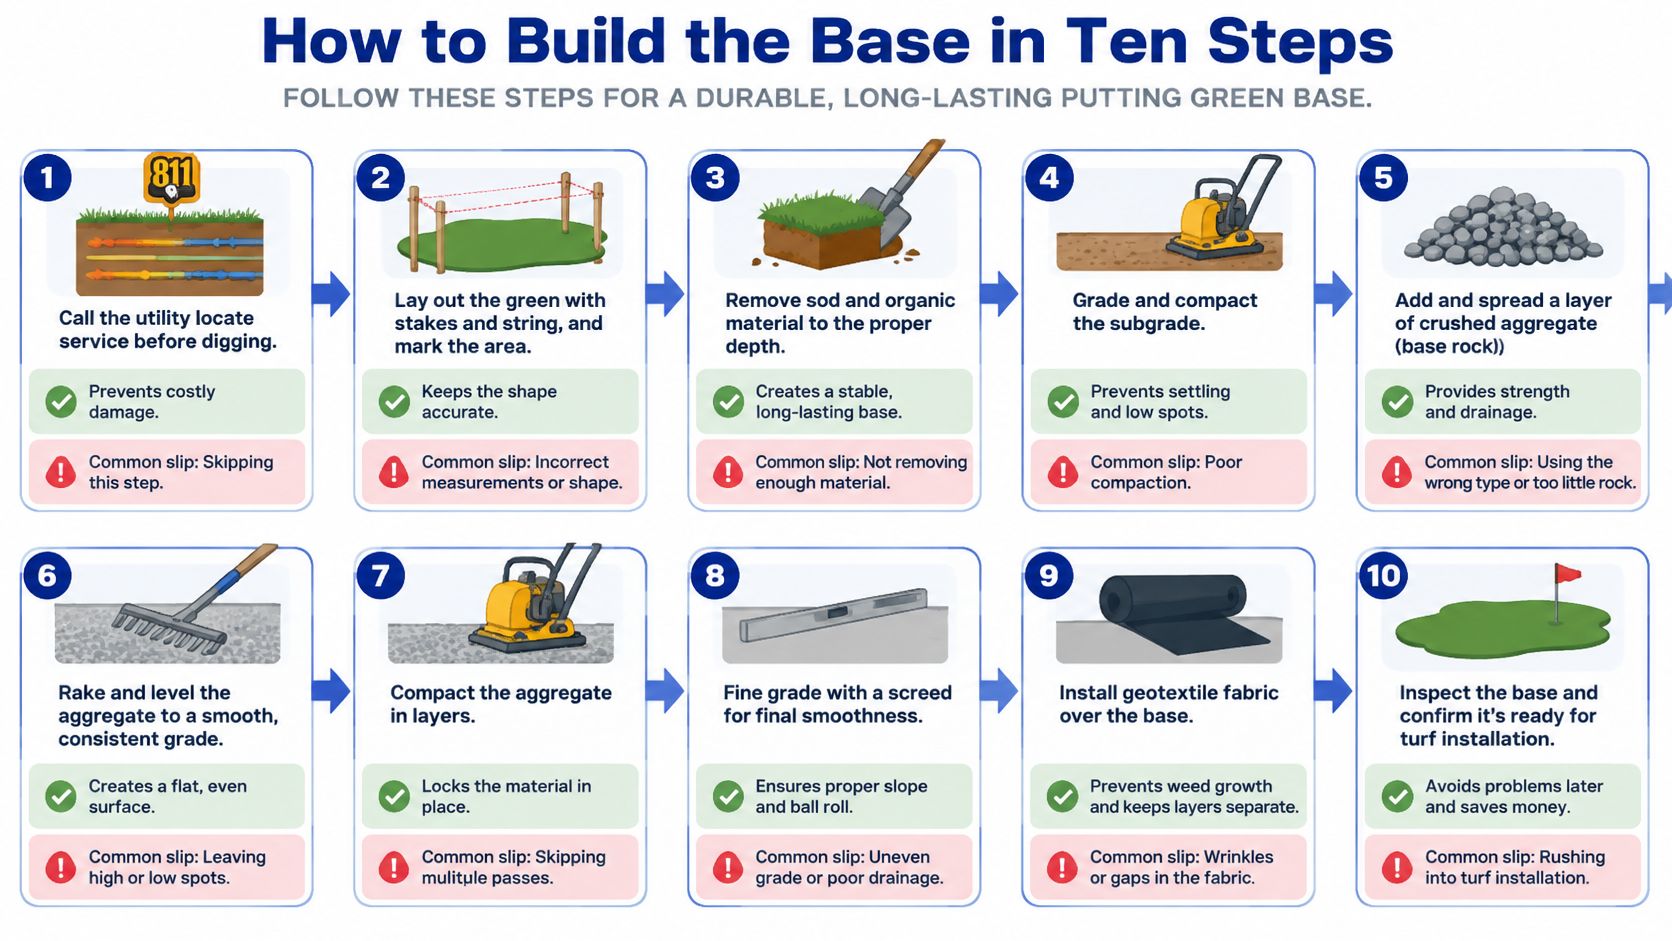
Use this workflow to keep the buried work in the right order.
Follow the build order
Arrange utility locating before digging. Contact the utility locate service and identify private lines, including irrigation and yard lighting. Don't assume public utility marking includes every buried service.
Stake the outline and establish elevations. Use string for boundaries and a laser level for finished-surface marks. A tidy outline without elevation control still leaves you guessing how much to excavate.
Strip sod and unsuitable topsoil. Dig to the marked design subgrade, removing roots and organic material from the footprint. The usual mistake is stopping at an easy shovel depth rather than the planned elevation.
Compact and smooth the subgrade. Prepare suitable soil at workable moisture content and inspect for yielding areas. If it pumps or moves under the equipment, investigate instead of covering it.
Install the planned drainage route. Establish the outlet and work back through the collection system, maintaining continuous fall. Don't install a drain that ends in a low pocket with nowhere to discharge.
Place and compact aggregate in controlled lifts. Match loose lift thickness to the aggregate and compactor's capabilities, then compact each layer before adding more. Compacting a deep pile only at the top can conceal loose material underneath.
Check the installed base depth. Use controlled probes or small inspection openings against your elevation marks. Repair and recompact the inspection locations rather than leaving disturbed pockets.
Verify slopes and transitions. Compare laser readings with the design and sweep the surface with a straightedge. Correct low spots with compacted base material, not a heap of loose finishing fines.
Screed the approved leveling material. Use screed guides and a rigid straightedge to produce a smooth bed that follows the intended contours. Flat workmanship means no local bumps, not necessarily a level green.
Water-test before covering the base. Apply water gently at high areas and inspect low points and outlets. Investigate persistent ponding before turf installation makes access more difficult.
Keep delivery equipment off the finished bed. Wheel ruts and sharp turns can undo careful screeding immediately before the turf goes down.
How to Seam, Edge and Finish the Surface
Finishing requires patience more than force. Lay out the panels, cutting tools, seam tape and adhesive before opening any adhesive container, and check the permitted installation temperature and curing conditions.
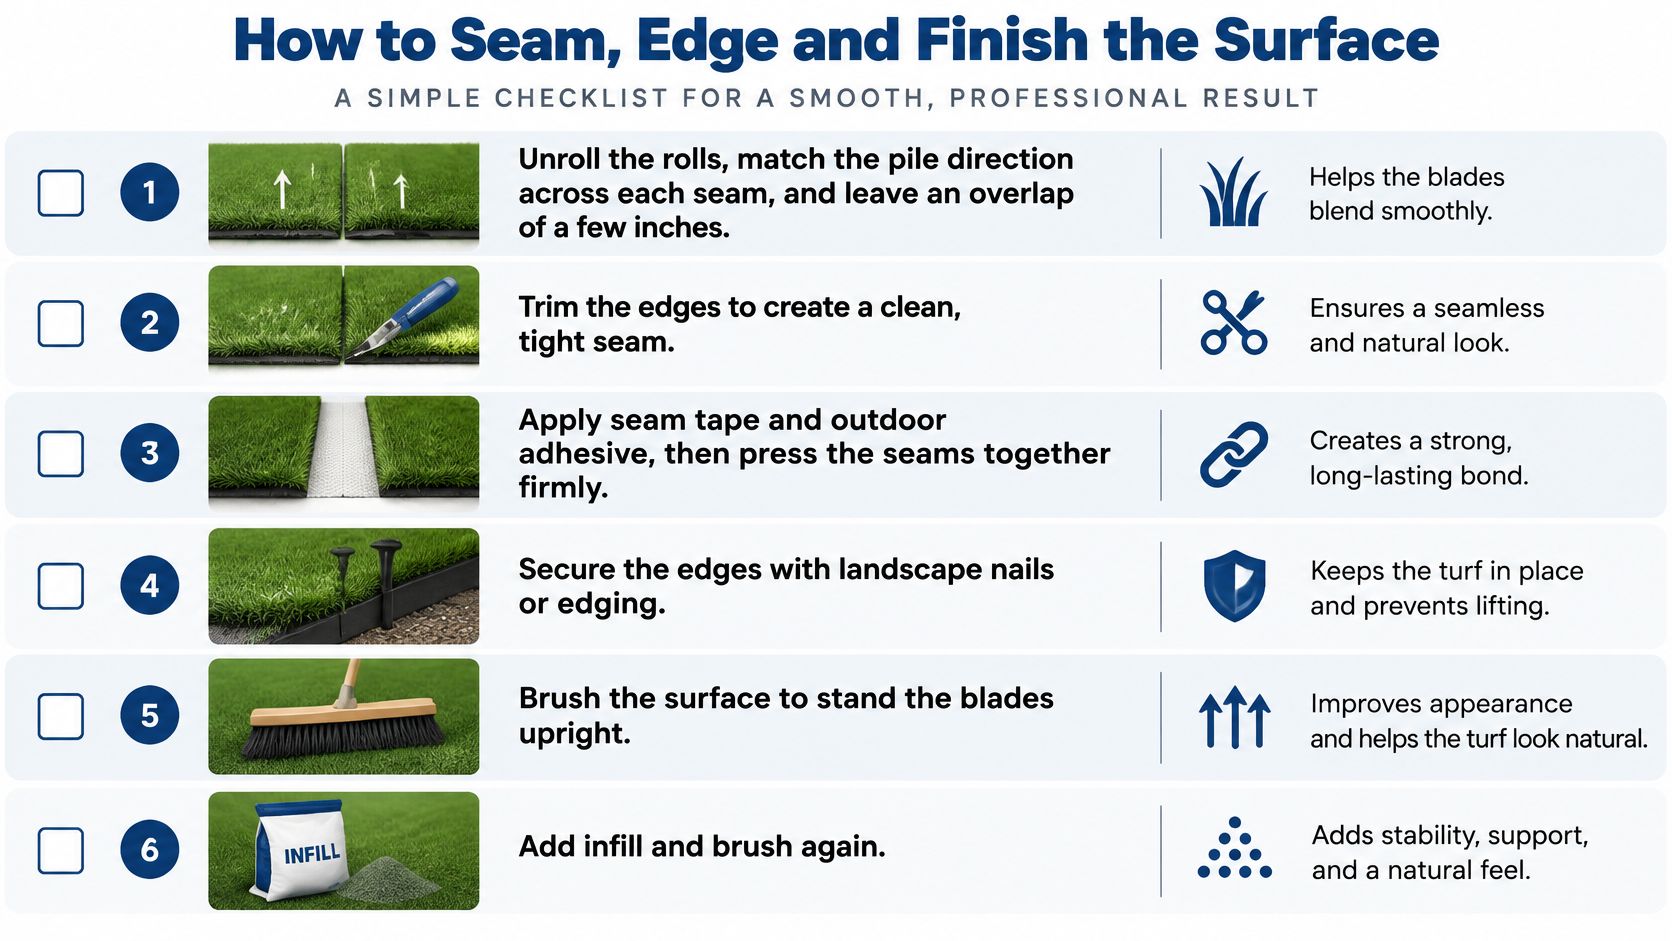
This checklist illustrates the finishing sequence.
Finish without disturbing the bed
Unroll and relax the panels. Match pile direction and leave a trimming overlap at joins. Allow the material to relax under the supplier's specified conditions so you aren't fastening shipping creases into place.
Trim the mating edges carefully. Use a sharp blade and protect the fibers while cutting the backing. A paired overlap cut can work where the product permits it, but cutting separately between stitch rows may better protect the pile.
Bond the seams with compatible materials. Center the specified tape beneath the joint and apply adhesive at the prescribed coverage. Keep fibers out of the adhesive and maintain the designed drainage paths; a seam bond isn't a waterproofing treatment.
Secure the perimeter to its restraint. Use the approved fastener type and spacing for that edging system. Don't drive fasteners so tightly that they create dimples or trap blades beneath their heads.
Make the final perimeter cut. Work against the secured outline without pulling the turf sideways. Keep the transition to paths or fringe tidy, with no exposed sharp edges or loose flaps.
Distribute the specified infill evenly. Use a calibrated spreader and apply manageable passes rather than dumping piles. Uneven infill can produce different playing characteristics across an otherwise smooth green.
Brush using the recommended equipment. Work the infill into the pile with a turf-safe broom or approved power brush. Aggressive brushing can damage fibers, so don't treat every putting product like standard turf.
Test joins, cups and edges. Roll balls across each seam from different directions and check for hopping or deflection. Reinspect the perimeter after warm conditions and foot traffic reveal any loose areas.
Set the cups accurately
Install cup sleeves and supports as part of the planned assembly, before final infill. Check that each cup is stable and that the surrounding surface has no raised collar or local hollow.
A smooth approach matters more than a neat flag. Test putts from different directions before accepting the cup setting.
Common Installation Mistakes and How to Fix Them
A soft spot that sinks beneath your shoe deserves attention before you adjust infill or brushing. It may indicate loose aggregate, yielding soil or a water problem beneath the installation. Press around the area and mark its boundaries so you can distinguish a local defect from wider movement.
Repair duration is best established after opening the affected area. A small surface adjustment may fit into a short work session; excavation, wet-soil correction and adhesive curing can require a longer, staged repair.
Installation symptoms, causes and fixes
| Symptom | Likely cause | Fix |
|---|---|---|
| Soft spot that sinks under foot | Loose base, yielding subgrade or trapped water | Lift turf, investigate support, rebuild and compact; allow for excavation and drying |
| Ball rolls off line near one area | Local dip, settlement or uneven infill | Check with a straightedge, isolate the cause and correct it; localized work unless settlement extends |
| Standing water after rain | Reversed fall, blocked outlet or restricted permeability | Trace the water route and restore it; drainage excavation may require staged work |
| Ripples or wrinkles across the surface | Installation tension, insufficient relaxation or displaced infill | Diagnose tension, release and relay where necessary; allow suitable weather and curing time |
| Lifting seams or edges | Weak bond, failed restraint or movement underneath | Repair support, clean bonding surfaces and resecure; reopen only after the specified cure |
Separate surface defects from support failures
If a ball changes direction at one spot, first remove debris and inspect infill distribution. Then place a straightedge across the area from several directions. A consistent gap or rocking straightedge points toward a shape problem rather than a putting stroke problem.
Lift enough turf to work properly. Trying to push aggregate through a small opening can leave an uncompacted patch beside the original defect. Restore the supporting layer, compact it and feather the transition before replacing the turf.
For ponding, inspect the outlet before digging into the green. Leaves, displaced edging or runoff from an adjacent bed may be responsible. If the surface falls away from the outlet, clearing the pipe alone won't solve it.
Don't hide settlement with extra infill. Repair the material that moved.
Match the repair to the actual cause
Brushing can redistribute infill and lift compressed fibers, but it won't remove a fold caused by excess backing material. A tension-related wrinkle may require releasing the perimeter and relaying the panel under suitable conditions.
For lifting seams, remove failed adhesive and contaminated material as the bonding system requires. Adding fresh adhesive over dirt or a loose old bond gives you another weak connection.
Prioritize trip hazards, active settlement and blocked drainage. Cosmetic pile shading can wait until the structure and footing are sound.
Decide Whether to Build It Yourself or Hire a Crew

The decision comes down to the dirt, the access and the drainage, not to whether you can unroll turf and cut a cup. A simple outline on stable, accessible ground is a reasonable DIY project if you will rent a plate compactor and laser level, set screed guides and check your own work. A shovel and utility knife will not carry the job.
The key question is whether you can excavate, move, compact and verify the supporting materials without taking shortcuts in the base.
Choose according to site difficulty
- Build it yourself when the layout is straightforward, the outlet is clear and you can move aggregate without crossing the finished bed.
- Hire a specialist crew when the yard has difficult slopes, soft soil, restricted access, complicated joins or uncertain drainage.
- Request a written design if proposals omit base materials, compacted thicknesses, outlet details or cup support.
Ask prospective installers how they verify compaction, check elevations and handle unsuitable soil found during excavation. A useful proposal explains the layers and the testing, not just the turf brand and outline.
For a turnkey route, ask a local putting-green installer to assess the yard before you buy materials. Have the crew explain how the proposed contours suit your practice goals and how runoff from surrounding ground will be managed.
Before you order, measure the footprint, inspect the soil and mark the high side and possible outlet. Compare that site information with the layer stack, then get the base depth and drainage plan confirmed in writing.
Waterloo Turf Indianapolis offers custom backyard putting greens with site assessment, base construction, drainage planning and turf installation. Visit Waterloo Turf Indianapolis to request an assessment and discuss a build plan for your yard, including contours, cup locations and the work beneath the surface.